Back to Stories
Last Minute DIY Christmas Decorations
Share
Save


Added by Housebuild
3 years ago
Filed in Tips & Tricks
Share
Save
Last Minute DIY Christmas Decorations
Christmas comes around faster and faster each year. Sometimes you may run out of time to buy new décor before the 25th December arrives, or maybe you just prefer to make your own ornaments!
Whatever the reason, we have a range of DIY crafts for you to create. Keep your kids busy over the Christmas holidays by getting them in on the fun of making their very own Christmas decorations. Enjoy!
1. Penguin Lightbulb
All you need for this decoration is an old lightbulb, a piece of string/ribbon, some paint, and hot glue. You can use rubbing alcohol to help the paint stick to the bulb better and let that dry before you begin painting. Be careful that the bulb does not fall and smash when doing this activity with children.
Use black and white paint for the penguin’s body and some other colours, like orange and blue, for the eyes and beak. The string is to hang the ornament from the tree but if you have extra, you could create a bow tie or scarf.
Once the paint is dry, add hot glue to the top and hang the string or ribbon in a loop onto it. Once that has dried in, hang it from your tree!
You can repeat this with snowmen, Santa, or your favourite Christmas character.

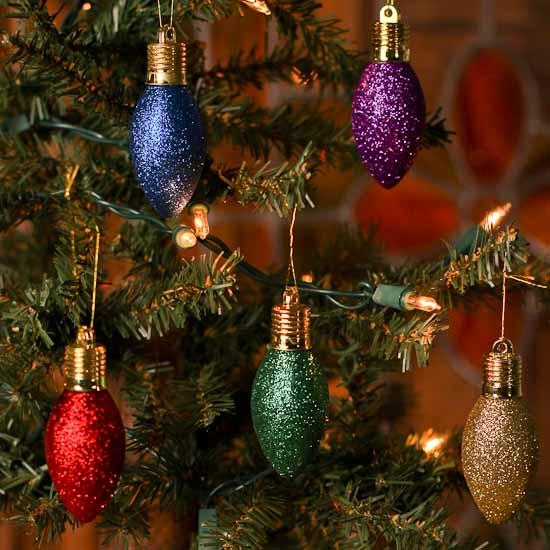
2. Glitter Lightbulb
This is a similar decoration but with more sparkle! You can dip the outside of the bulbs in Mod Podge or else paint them a similar colour to the glitter you will be using. Then while they’re still wet, dip the bulbs in your glitter.
Repeat the final step of using hot glue and ribbon or string on the top and hang your sparkly ornaments.
3. Santa & Elf Cutlery Holder
This idea will add to your dining table on Christmas Day. For this craft, use green or red card for the pockets, representing Santa and his Elves. On an A4 piece of card cut out two semi circles on both longer sides. You should have four semi circles altogether when done. Once folded in half, the top and the bottom of the pocket will be created. Tape either side together. On top of this, you can cut out black and silver, white or gold card and create the buttons and belt of Santa and the elves suits.
Slot your cutlery into the holders and set onto the dining table, ready to use on Christmas day!

4. Snowman Candle Holder
Use an old candle holder or a mason jar to create this Snowman candle holder. Rip up pieces of white tissue paper or if you prefer, buy some fake snow and glue it to your glass jar. You can then add features to your snowman. Use buttons as eyes, a cardboard triangle for the nose, and ribbon for the bowtie, for example. You could even get some pipe cleaner and pompoms and keep your snowman warm with earmuffs.
Add a candle or a light into the jar and watch your snowman come to life!

5. Paper Snowflakes
Create various snowflake shapes with this next DIY. Take a piece of A4 paper in whatever colour you like – it doesn’t have to be white.
1. Fold the paper over into a triangle and cut off the excess piece at the bottom.
2. Fold the triangle again into a smaller triangle
3. Turn your triangle upside down and fold the right side, just slightly over the centre of the triangle
4. Repeat on the left side so that they overlap. There should be two smaller triangles coming out on top.
5. Cut the two pieces on top off so that you have an isosceles triangle.
6. Use your scissors to cut out pieces and make different shapes
7. Open your paper up and you will have a snowflake!
8. Punch a hole and add some string to hang your snowflake up.

6. Floating Candles
Floating candles are chic and simple to make. Just fill a clear jar, glass, or anything with water and submerge some holly or mistletoe to create a Christmas-themed candle. Add a tealight on top which will float, and light it to create a wonderful ambiance.

7. Mason Jar Snow Globe
If you still somehow have spare jars or glasses lying around, then you should try the one! Use the fake snow you used for your Snowman candle holder and add it into your jar. Once that is done, add any ornaments you have to spare – maybe the string has broken off or you have replaced them this year – and add them into your jar to create a Winter Wonderland. These are simple to make and a great addition to leave around your home.

8. Handprint Ornament
If you have a child and want to make a personal gift for Grandparents or even to add to your own tree, then this is the DIY for you! Get a plain bauble and place your baby’s hand or foot in paint or glitter, and then transfer it onto the bauble. Paint on extra in any space that needs it and leave to dry.
This is a very sentimental idea that everyone will love!

9. Ornament Filled Jars
This has to be our most simple DIY yet! Take any old ornaments and fill your jars or other clear containers to the brim. Add LED lights and add them around the ornaments too if you’d like. Use different sized jars and a variety of ornaments to create a wonderful effect. These can be used as a centrepiece on your dining table or in the hallway.

Product From this post
No products tagged in this story.